
By AsiaQuartz Editorial Team
Technical review by AsiaQuartz Product, QC & Supply Chain Team
Updated: June 2026
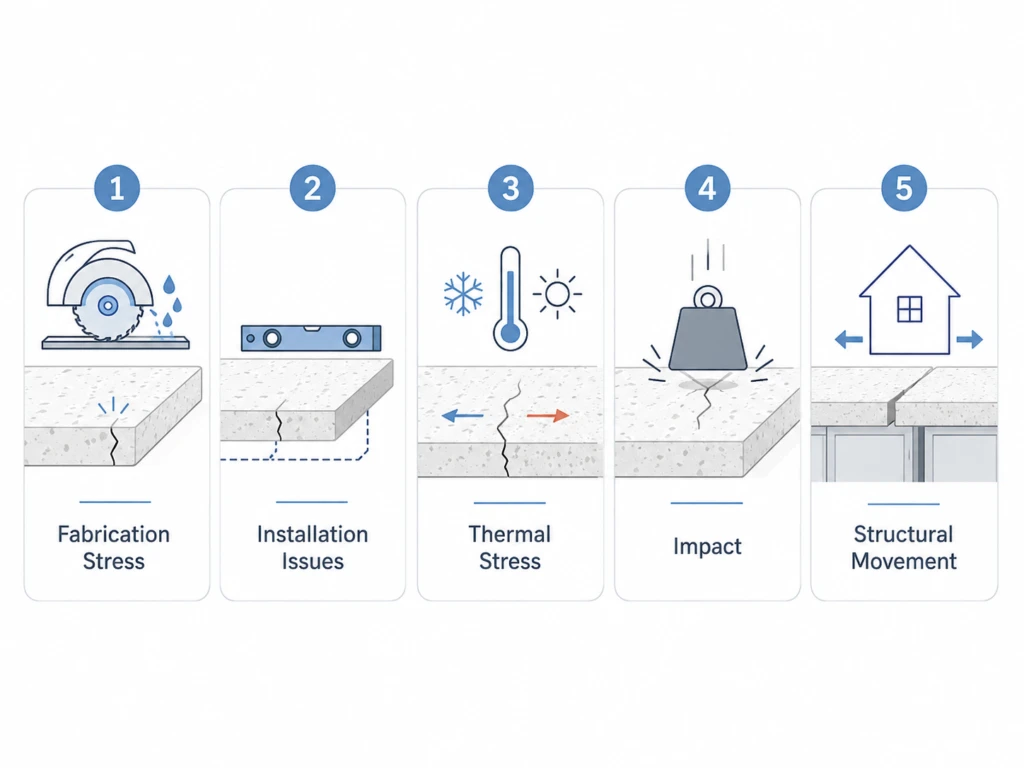
First, quartz countertops are durable engineered surfaces, but they are not immune to cracking. When a crack appears, the cause may be related to fabrication, installation, heat exposure, impact, structural movement, transport damage. Or a combination of factors. The crack pattern can provide useful clues, but it should not be treated as a definitive diagnosis on its own.
For importers, fabricators. And project buyers, the practical goal is to identify where stress can enter the system before the countertop reaches the customer. However, this guide covers five common crack mechanisms, what buyers should inspect, and which controls can reduce avoidable failures.
First, Quick answer: Cracks near sink or cooktop cutouts often point to stress concentration, insufficient corner radii, unsupported sections. Or installation movement. Specifically, cracks near heat sources may involve thermal stress. Star-shaped damage may indicate impact. However, material, fabrication, transport, installation, and building movement should all be reviewed before assigning responsibility.
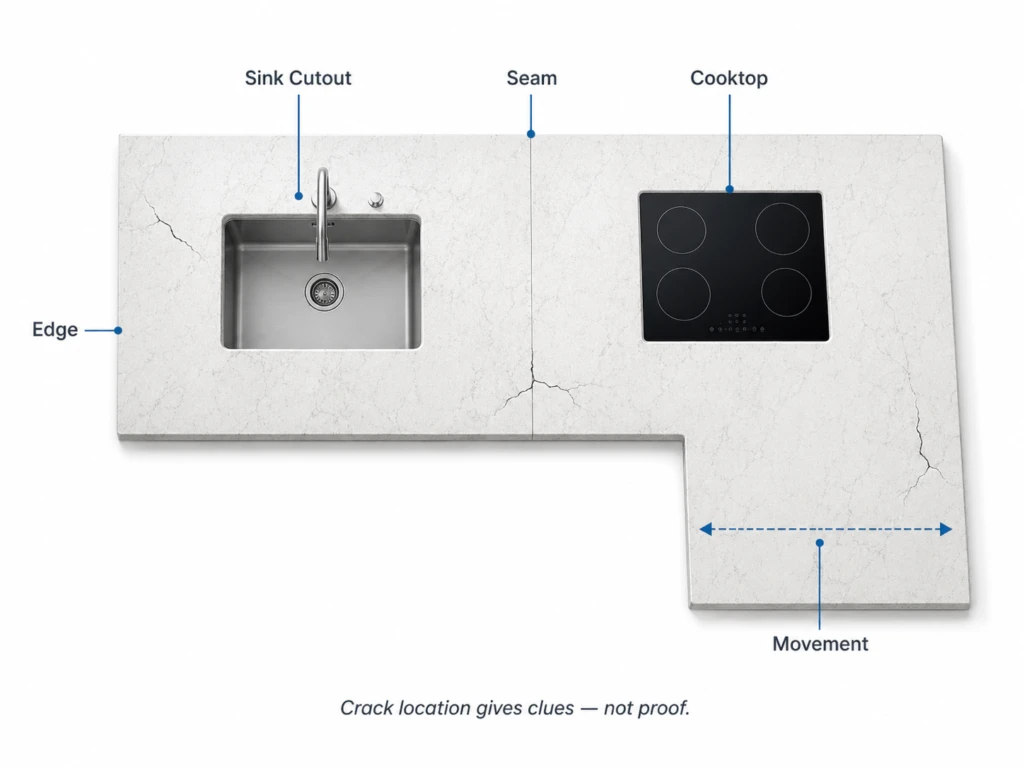
1. Fabrication Stress: Cutouts, Corners, and Cutting Methods
First, fabrication is one of the most important places to control cracking risk. Sink and cooktop cutouts remove material from the slab and create areas where stress can concentrate. Specifically, poor cutting technique, damaged drill points, sharp internal corners. Or insufficient support can increase the chance of a hairline crack developing during fabrication, transport, installation, or later use.
Common fabrication risk points include:
- Dry or overheated cutting. Manufacturer fabrication guidance commonly requires wet diamond cutting tools to control heat and reduce damage at the cut line.
- Insufficient radius at internal corners. Do not use one universal radius for every quartz product. For example, MSI’s Q Quartz installation guidance calls for a minimum 3/8-inch radius at countertop corners and cutouts, while Caesarstone’s current professional guidance specifies a minimum 10 mm (3/8 inch) radius for sink and cooktop cutouts.
- Cutting beyond a drilled corner. Damage to a core-drilled corner can create a stress point from which a hairline crack may propagate.
- Unsupported fabrication or handling. Large openings, narrow rails around cutouts, long overhangs, and partially supported pieces require controlled handling and support.
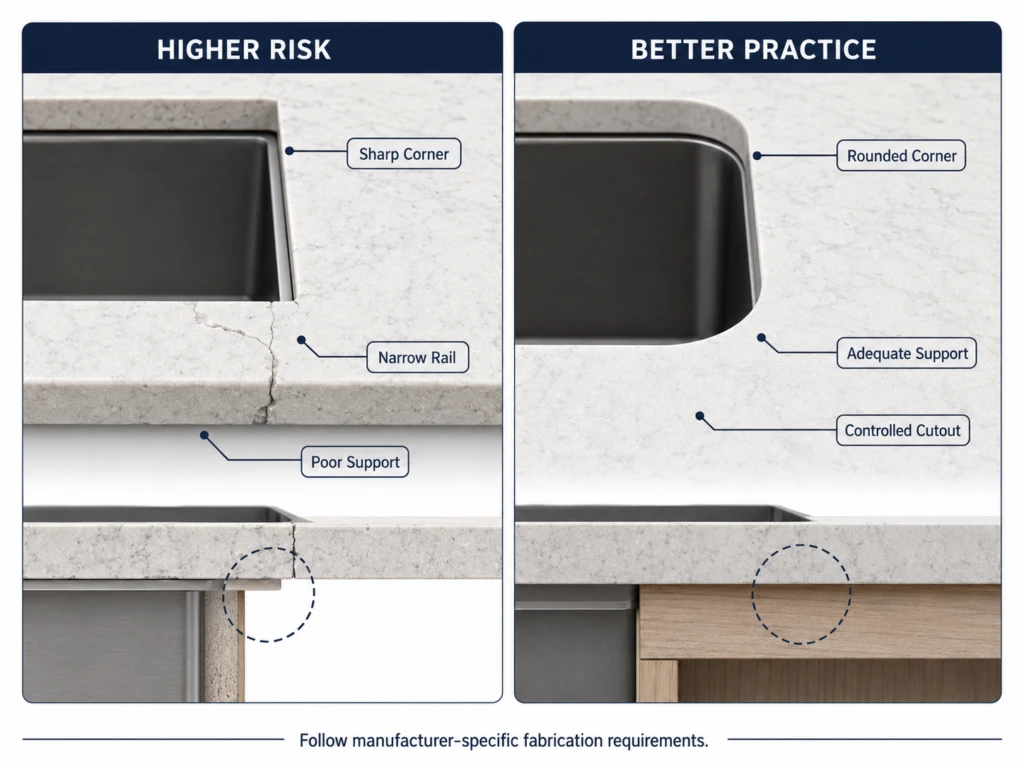
First, Buyer note: A crack that becomes visible after installation does not automatically prove a slab manufacturing defect. Review the cutout geometry, fabrication method, support, transport records, installation conditions, heat exposure, and impact history before deciding the root cause.
2. Installation Issues: Clearance, Support, and Substrate Flatness
First, a fabricated top still depends on the installation system below and around it. Quartz should not be forced into an opening or installed against an uneven or unstable substrate. Specifically, manufacturer requirements vary, so the selected product’s fabrication and installation manual should control the final detail.
Three installation issues deserve particular attention:
- Insufficient clearance. MSI’s current Q Quartz guidance, for example, calls for a minimum 1/8-inch clearance between the quartz and surrounding walls and also specifies allowance around sink and cooktop cutouts for expansion. Treat those values as product-specific manufacturer guidance, not a universal rule for every quartz brand.
- Inadequate or uneven support. Cabinet tops and support structures should be flat, stable, and designed for the selected slab thickness, span, seams, cutouts, and overhangs.
- Incorrect fastening or adhesive strategy. MSI specifies flexible 100% silicone at perimeter support points for its Q Quartz system. Seam adhesives and other attachment details should follow the product manufacturer’s installation instructions rather than a generic rule such as “always use silicone” or “never use epoxy.”
For a deeper look at cutting, edges. And decorative printed surfaces, see our Fabricating Printed Quartz guide.
3. Thermal Stress: Rapid or Sustained Heat Exposure
First, quartz is heat resistant, but it is not heat proof. Manufacturer care guidance warns that sudden temperature changes or sustained heating can create enough thermal stress to damage the resin-bound surface or contribute to cracking, especially near edges and cutouts.
Possible warning patterns include:
- Cracking that begins close to a cooktop, appliance opening, or other concentrated heat source.
- Damage near an edge or cutout that has also experienced repeated heating.
- Discoloration or surface damage in an area where hot cookware or a heat-generating appliance was placed directly on the countertop.
First, prevention is straightforward: use trivets or hot pads, maintain appliance clearances required by the countertop and appliance manufacturers. And avoid placing very hot cookware or heat-generating devices directly on the quartz surface.
4. Impact and Point Loads
First, quartz can resist normal daily use. But a concentrated impact can chip an edge or initiate a crack, particularly near a cutout, unsupported span, seam, or thin section. Specifically, the severity depends on the impact energy, location, support conditions, edge geometry, and the individual product.
First, impact damage may appear as a chip, a local fracture, or cracks radiating from a point. However, appearance alone does not prove the cause. Before classifying a claim as impact damage, review the underside support, cutout geometry, existing chips, installation level, and any available site history.
5. Structural or Substrate Movement
First, sometimes the countertop is responding to movement elsewhere in the installation. Cabinets can settle, substrates can deflect, walls can move. And buildings can experience seasonal or long-term movement. A rigid countertop spanning an unstable or uneven support system can develop stress at seams. Cutouts, corners. Or transitions.
Possible indicators include:
- Cracking accompanied by movement or gaps in nearby cabinetry, tile, drywall, or joints.
- A seam that repeatedly opens or changes alignment.
- Similar cracking patterns occurring across several tops connected to the same substrate or building element.
If structural or substrate movement is suspected, repair the underlying condition before attempting a cosmetic countertop repair.
What a Crack Can Tell You: A Screening Table
First, a crack pattern can narrow the investigation, but it cannot determine liability by itself. Use the table below as a screening tool, then confirm the likely cause through site inspection and fabrication, installation, transport. And product records.
| Observed pattern | Possible causes to investigate | First check |
|---|---|---|
| Crack extending from a sink or cooktop cutout | Corner radius, cutting damage, narrow rail, support, installation movement, heat | Inspect cutout geometry, drilled corners and underside support |
| Crack close to a wall, seam, or change in support | Insufficient clearance, substrate movement, uneven cabinets, seam support | Check clearance, level and support conditions |
| Damage near a concentrated heat source | Rapid or sustained heat exposure, insufficient appliance clearance | Review appliance location and heat history |
| Local chip or radiating fracture | Impact or concentrated point load | Inspect impact point and support below |
| Recurring cracks across several tops | Structural or substrate movement, repeated fabrication/installation detail | Compare locations and inspect the common support condition |
Repair or Replace? Diagnose Before You Touch the Crack
First, crack repair should be more conservative than a generic “fill and polish” recipe. A small cosmetic chip, pit. Or localized surface defect may sometimes be repaired with a manufacturer-compatible resin or epoxy system. A structural crack is different and should not automatically be opened with a grinder, filled. And polished.
Before repair, determine:
- Whether the crack is superficial or passes through the slab thickness.
- Whether the crack is stable or continuing to grow.
- Whether it begins at a seam, sink/cooktop cutout, unsupported section, or structural movement point.
- Whether the repair may affect the manufacturer’s or installer’s warranty.
- Whether the selected resin, epoxy, curing method, and finishing procedure are approved for the specific quartz product.
First, manufacturer repair instructions vary. For example, MSI publishes repair guidance for localized quartz damage and recommends specially formulated resin or epoxy for certain small surface defects. Specifically, that does not mean every crack should be repaired the same way.
First, Do not use a universal resin-to-hardener ratio or polishing sequence. Repair chemistry. Catalyst ratios, cure times, color matching. And finishing methods vary by system. Follow the repair-product and quartz-manufacturer instructions or use a qualified fabricator.
First, replacement or professional structural assessment is generally the safer route when the crack is through-thickness. Actively growing, associated with a failing seam or substrate. Or caused by unresolved structural movement.
What Importers and Fabricators Should Check Before Shipment
First, not every countertop crack starts before shipment. However, strong factory-side controls can reduce uncertainty when a claim occurs later. Before loading, importers should document the condition of slabs or prefabricated tops and keep clear QC and packing records.
- Inspect slabs and prefabricated pieces before packing. Record visible chips, cracks, cutout condition, edge condition, and other agreed QC points under adequate lighting.
- Control packing pressure and support. Use the approved A-frame, crate, cushioning, separators, edge protection, and strapping method for the product and shipment. Avoid unsupported contact points and excessive localized pressure.
- Verify dimensions and thickness. Thickness alone does not determine flexural strength. However, thinner sections generally have lower section stiffness and load capacity, so they may require more conservative handling, support, span, and application design.
- Review cutouts on prefabricated tops. Confirm corner geometry, narrow rails, seam locations, edge profiles, support assumptions, and the approved drawing before packing.
- Maintain claim evidence. Keep pre-shipment photos, slab or piece identification, packing photos, loading records, drawings, and relevant QC records. These records make it easier to compare the product’s condition at shipment with any later field damage.
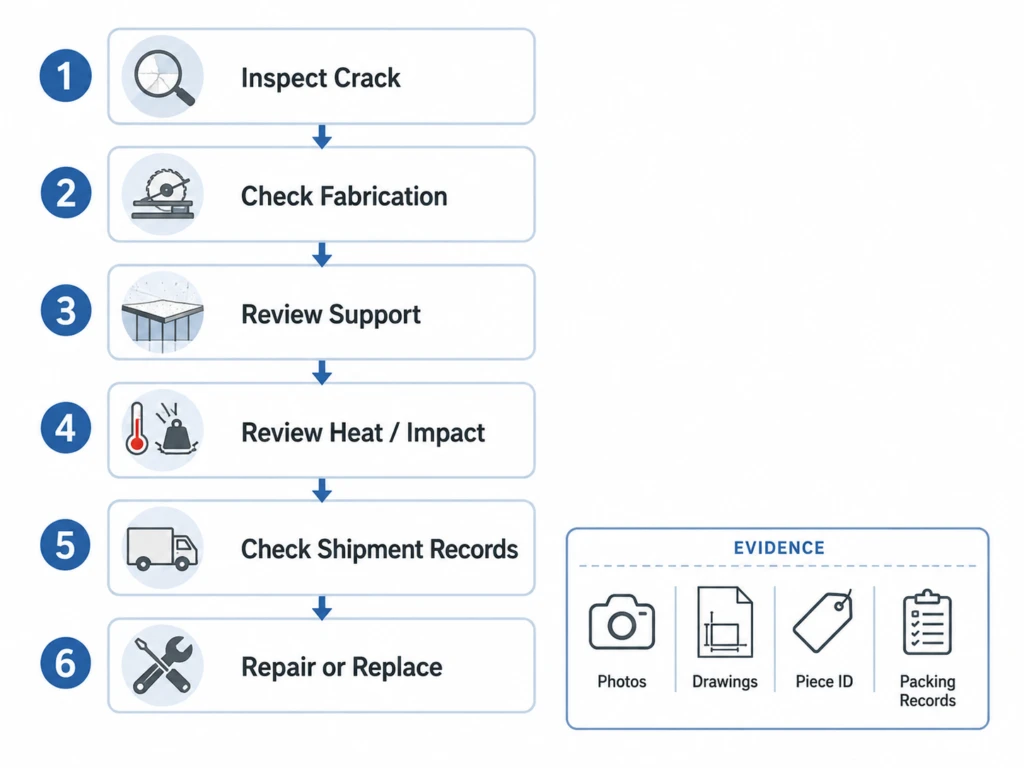
First, additional shipment controls are covered in our Quartz Slab QC & Packing Guide. You can also review our Quartz Slab Sizes Guide for standard dimensions and thickness formats. Or use the Prefab Quartz QC Checklist for prefabricated projects.
First, Request a Supply Review — if you’re sourcing quartz slabs or prefabricated tops. AsiaQuartz can review the agreed product format, QC scope, packing approach. And shipment documentation before production and loading. Start at our contact page.
How this article was prepared:
- Manufacturer guidance: Fabrication, installation and care points were cross-checked against current professional guidance from MSI Q Quartz and Caesarstone. Manufacturer-specific dimensions and methods are identified as examples rather than universal industry standards.
- AsiaQuartz scope: Supply-side recommendations focus on pre-shipment inspection, packing, traceability, drawings, and evidence that can help distinguish shipment condition from later fabrication or installation issues.
- Limitations: Crack appearance is not a laboratory diagnosis and does not by itself establish fault. Final assessment may require the fabricator, installer, product manufacturer, repair specialist, or structural professional.
First, About this article: This article was prepared using product-manufacturer guidance and AsiaQuartz supply/QC experience. External guidance supports general fabrication, installation, care, and repair principles; it does not independently verify AsiaQuartz capabilities. Specifically, product-specific manufacturer instructions should take priority where they differ from general planning guidance.
First, Information status: Reviewed through August 13, 2026. Fabrication details, installation requirements, warranty conditions, approved repair systems, and technical limits vary by product and manufacturer. Specifically, confirm the exact product documentation before fabrication, installation, repair, or claim determination.
Sources:
- MSI Surfaces — Q Quartz Installation Guidelines. Supports wet diamond cutting, cutout/corner radius guidance, clearance, support, silicone fastening, and inspection requirements. MSI Quartz Installation Guide (accessed August 13, 2026).
- MSI Surfaces — Q Quartz Care & Maintenance. Supports use of trivets/hot pads and warnings about sudden or sustained heat exposure. MSI Quartz Care & Maintenance (accessed August 13, 2026).
- Caesarstone Master of Stone — Common Mistakes Guide. Supports current professional guidance on cutout radii, drilled corners, stress points, and crack prevention. Caesarstone Common Mistakes Guide (accessed August 13, 2026).
- MSI Surfaces — quartz repair/care resources. Supports manufacturer-specific use of formulated resin or epoxy for certain localized surface defects; repair instructions should be product-specific. MSI Quartz Repair Resources (accessed August 13, 2026).
Related Reading
- Fabricating Printed Quartz: Edges, Cutting, and Surface Repair — fabrication considerations for printed quartz.
- Quartz Slab QC & Packing Guide for Importers — inspection and packing checks before shipment.
- Quartz Slab Sizes, Thicknesses & Specifications — standard slab formats and thickness options.
- Prefab Quartz QC Checklist — checks for prefabricated tops.
- Quartz Supply FAQ — common questions on QC, packing, products, and project supply.